
I have an old possibly 1970s road racer bike that I managed to snap the chainring on and then bits eventually started dying and falling off in the summer of 2013. It was then left outside to die slowly, exposed to the elements. It was never the quickest to accelerate but once up to speed it coasted along beautifully sucking up all the bumps with its steel frame – all in all it was easily as quick as the cheap aluminium bike I had at the time.
This Summer, I took on the challenge to restore it to its former glory, but rebuild it as a fixie bike, partly because it’s easier and partly for style reasons. The plan was to replace anything that had seen better days and hopefully teach me some things too.

The first step was to take off the old wheels and strip the frame of anything that was no longer required on a fixie bike like the derailleurs, brakes, cables and so on.

Investing in some more flamboyant wheels to suit a fixie, these were attached and a new saddle bought (not a Brooks, but an imitation).

It was at this point I decided a re-spray would make the whole thing look far nicer. Time to take everything back off and start sanding.

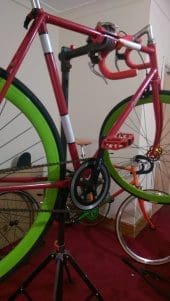
Deciding to spray paint the bike, I went for a few coats of white primer, a dark red and lots of lacquer on top for protection. In theory this would give it the maximum protection. I could probably have masked things better, but it sufficed. The work stand worked surprisingly well as a painting stand and the colours left on the stand from overspray give it some character.

The first coat of red paint scared me a bit, because it went on and looked very bright as well as quite pink as it mixed in with the white primer underneath. I’d bought the darkest red possible and thought I’d made a big mistake! I’d also masked off some areas to keep white, the theory being it was easier to do that now rather than add it in later as well making the frame not just a solid red.

The finished coat of red!

I managed to source a company that makes old school vintage bike decals and having sanded off the original decals wanted something that gave a nod back to its origins.

The Elswick decal was only a couple of quid and looks great on the bike.

I noticed that some of my lines were not quite perfect from masking during the red paint stage and there was the odd smear or line on the areas of white. Rather than re-doing these areas properly, I used some car pinstriping tape to hide the less than perfect lines between red and white.

Paint-job complete, it was time to re-add the new bits and pieces to the finished painted fixie. A new chainring replaced the one that looked tatty originally and the saddle went back on.

Time for the wheels to go on, definitely looks better than the last time I was at this stage!

And finally, fixie all done! The chain was probably the most difficult thing to get right with one chain completed ruined before it was sorted. I’d never set up a fixed gear bike before so it took some learning. Once the chainring had been re-set the chain lined up correctly, stopped rubbing and started to ride smoothly. One test ride jumped the chain off and ruined a bit of the paint work on the driveside chainstay, took an extra link or two out and it’s now spot on. I’ve gone for only front brakes and using my legs as resistance for the back brakes (beauty of the fixie approach), big flat pedals help massively with this!
It’s definitely been a worthwhile project, turning something broken into a useful fixie bike instead of it rusting away doing nothing – it took about £150 all in all to do (nearly everything was sourced on Ebay) and I think the only specialised tool I used was to get the chainring off and on (which I had already, but it’s cheap as).
Now I have a new toy and something more interesting and different to what I already have.