You can inflate a Presta valve without an adapter if your pump has a Presta-compatible head. Many bicycle pumps accommodate both Presta and Schrader valves, although some need their head reconfigured before use. If your pump genuinely supports only Schrader valves, you need a suitable adapter or a different pump.
The first job is therefore to check the pump connection. Holding a Schrader-only head at an angle and trying to seal it with your thumb is not a reliable solution. The head needs to fit the valve properly, allowing you to inflate the tyre without air escaping around the connection or putting sideways pressure on the valve.
Does your pump already fit Presta valves?
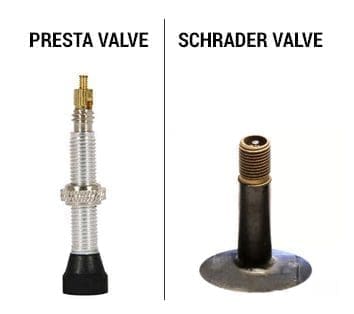
A Presta valve is the narrow type with a small threaded nut at its tip. A Schrader valve is wider and resembles the valve on a car tyre. Our guide to bike tyre inflation and valve types explains how to recognise them.
Check the pump head for a label, diagram or separate openings. Having only one opening does not necessarily mean it is Schrader-only: some heads accommodate both valve types.
| Pump connection | What to check |
|---|---|
| Two separate openings | Identify and use the opening marked for Presta. |
| One opening with automatic compatibility | Confirm that the manufacturer lists Presta support, then follow its attachment instructions. |
| A reversible internal fitting | Check the manual for the correct orientation of the internal parts. |
| A screw-on hose | Check whether the hose has separate Presta and Schrader ends or fittings. |
| A Schrader-only connection | Use a Presta-to-Schrader adapter or a Presta-compatible pump. |
Do not dismantle an unfamiliar pump head on the assumption that every design is reversible. The arrangement varies between models, and loose internal parts can be easy to misplace.
How to inflate a Presta valve without an adapter
These steps apply to a conventional Presta valve and a compatible bicycle pump. If your valve uses a different mechanism, follow its own instructions.
1. Remove the dust cap
Unscrew the protective cap, if fitted, and put it somewhere you can find it again. This exposes the small nut at the very tip of the valve.
Leave the larger retaining nut beside the rim alone. It is separate from the nut you need to open for inflation.
2. Open the small nut at the tip
Turn the small tip nut anticlockwise until it reaches the end of its normal travel. Leave it attached. You are opening the valve, not removing the complete valve core.
Briefly press the tip to check that it moves freely. If the tyre contains air, you should hear a short hiss. A completely flat tyre may make no sound. This opening-and-tapping procedure is also described in Park Tool’s valve instructions.
3. Attach the correct pump fitting
Keep the pump head aligned with the valve. For a push-on connection, seat the head fully before operating its locking lever as instructed by the manufacturer. For a screw-on connection, engage the threads gently without forcing them.
Support a small hand pump while using it so that each stroke does not rock the valve backwards and forwards. If the connection will not fit, stop and check the head configuration.
4. Inflate while checking the pressure
Pump steadily and watch the gauge. If air escapes around the connection, release the head, check its position and attach it again.
Use a pressure appropriate to your tyre, wheel, rider weight and riding conditions, within the limits specified for your equipment. A maximum pressure is a limit, not an instruction to inflate every tyre to that figure. Where tyre and rim limits differ, do not exceed the lower applicable limit.
If you have just fitted a tyre or tube, check that the tyre is seated evenly before completing inflation. Stop if you notice a bulge or an uneven section at the rim.
5. Remove the pump and close the valve
Release or unscrew the pump head according to its design, keeping it straight as you remove it. A brief hiss can come from air remaining in the pump hose; it does not necessarily mean that the tyre has lost substantial pressure.
Turn the small tip nut clockwise until finger-tight, then replace the dust cap. There is no need to tighten the tip nut with pliers.
Can you use a normal bike pump on a Presta valve?
Yes, provided its connection supports Presta. “Normal bike pump” can mean a track pump, mini pump or another design, so the size and shape of the pump alone do not establish compatibility.
For example, the Park Tool PMP-4.2 mini pump supports both Presta and Schrader valves. That does not mean every mini pump uses the same head or switching procedure. Check your particular model before buying an adapter that you may not need.
If you borrow a pump during a ride, ask how its head works before attaching it. A compatible pump configured for the other valve type can appear to be the wrong tool.
What if you only have a Schrader pump?
A Presta-to-Schrader adapter provides the connection needed to use a suitable Schrader pump. With a conventional Presta valve, open the small tip nut before fitting the adapter, then follow the adapter’s instructions.
Without an adapter, the practical options are to borrow a Presta-compatible pump or obtain the correct fitting. Trying to compensate for the wrong connection by pressing harder, holding the head sideways or covering the opening with your thumb does not provide a dependable seal.
A car tyre inflator should not be assumed to work simply because an adapter allows it to connect. Its pressure control and suitability for bicycle tyres also matter.
Why is your Presta valve not inflating?
Work through the connection before assuming that the tube needs replacing.
| Symptom | What to check |
|---|---|
| Air hisses around the pump head | The head may be incorrectly configured, insufficiently seated or have a worn seal. |
| The handle becomes difficult to push immediately | Check that the tip nut is open and the valve is not stuck. |
| The gauge rises sharply but the tyre stays soft | Air may be pressurising the hose rather than entering the tyre. Check the valve and connection. |
| The valve disappears into the rim when attaching the pump | Support it while fitting the head and check that enough valve length is exposed. |
| The tyre inflates but then goes flat | Investigate a puncture, leaking valve or, with tubeless tyres, another leak in the system. |
A bent valve tip or damaged thread can also prevent a good connection. Forcing the pump onto it is unlikely to solve the underlying problem.
Do you need to remove the valve core?
No. Routine inflation through a conventional Presta valve requires opening the small tip nut, not unscrewing the complete core.
Some valves have removable cores for maintenance, but others do not. If air continues to escape after inflation, a removable core may need checking with the appropriate tool. Avoid gripping delicate valve parts with pliers.
The tube material does not change the need for a compatible pump connection. If you use lightweight tubes, check their manufacturer’s fitting and inflation instructions; our guide to TPU tubes covers that category in more detail.
What to keep in your puncture kit
Check your portable pump on your own bike before relying on it during a ride. It should attach securely, reach the valve beyond the rim and inflate the tyre to your required pressure.
If you expect to borrow a Schrader pump, a suitable adapter is a useful addition. For everyday use, a pump that connects directly to your valve avoids an extra fitting to carry and makes roadside inflation more straightforward.