
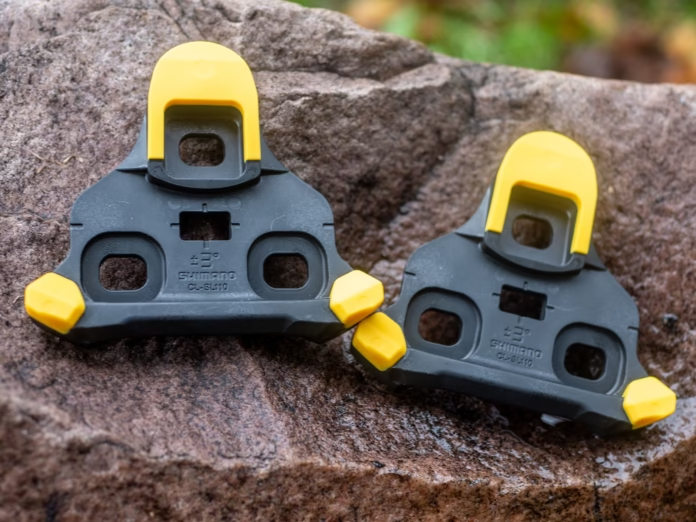
A new pair of clipless cycling shoes can feel completely wrong even when the size is perfect. The cleat may sit too far forward, the shoe might force the foot to point inwards, or the rider may discover at the first junction that a perfectly fitted cleat is incompatible with the pedals on the bike. None of these problems is solved by tightening the bolts harder.
Cleat setup has two separate jobs: making sure the shoe, cleat and pedal belong to the same system, then locating the cleat so that you can pedal comfortably and release reliably. There is no single millimetre measurement that suits every foot or riding style. The most useful process starts with a sensible position, preserves room for adjustment and tests engagement before leaving home.
Check pedal compatibility before touching the bolts
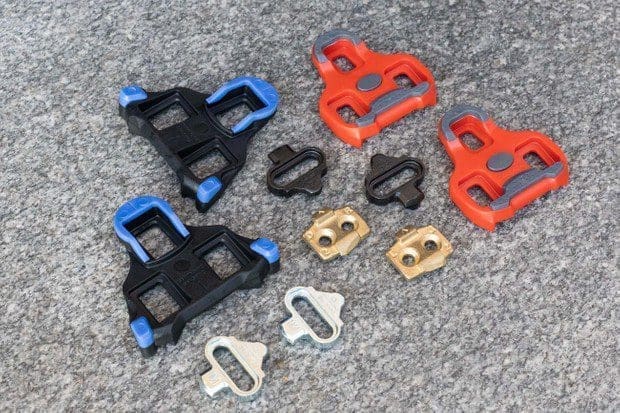
The phrase clipless pedals includes several systems. Shimano SPD uses a compact two-bolt cleat, often recessed into a mountain bike, gravel or commuting shoe. SPD-SL uses a larger three-bolt road cleat. Look Keo and other road systems also use a three-bolt mounting pattern on many shoes, but that does not mean their cleats will engage with Shimano pedals.
In 2026 Shimano introduced SPD-SLR, another road pedal and cleat interface. Its cleats are designed for SPD-SLR pedals and are not interchangeable with older SPD-SL pedal mechanisms. The mounting pattern alone is therefore no longer enough to establish compatibility within Shimano’s road range.
| System | Typical shoe mounting | Important distinction |
|---|---|---|
| Shimano SPD | Two-bolt | Compact cleat, normally recessed within the tread |
| Shimano SPD-SL | Three-bolt | Exposed road cleat for SPD-SL pedals |
| Shimano SPD-SLR | Three-bolt | Requires SPD-SLR pedals and matching cleats |
| Look Keo | Usually three-bolt | Different engagement system; not automatically SPD-SL compatible |
| Speedplay road systems | Model-specific shoe interface and adapters | Use the cleat and adapter specified for that pedal |
Some shoes have both two- and three-bolt mounting holes, or use an approved adapter. That allows a rider to choose between certain systems, not to clip one manufacturer’s cleat into any pedal with a similar outline. Our clipless pedals and cleats explainer covers the main families in more depth.
Where should a cycling cleat sit under your foot?
A practical starting point for many riders is to locate the ball of the foot inside the shoe, then position the cleat approximately beneath that part of the foot. Shimano’s two-bolt SPD setup guidance uses this as an initial fore-aft reference, while emphasising that subsequent adjustment may be required.
Finding the ball of the foot from outside a cycling shoe is not always obvious. With the shoe on, identify the bony prominence at the inside and outside of the forefoot, then use temporary marks on the upper or a piece of removable tape to help you identify the approximate line. Remove the shoe before making changes underneath it.
Do not treat the ball-of-foot mark as a compulsory final position. Some riders prefer a more rearward cleat, particularly for prolonged endurance riding, and shoe geometry affects what is possible. Other fit decisions, including saddle height and fore-aft saddle position, interact with cleat setup. Change one thing at a time and avoid making several large adjustments in one session.
How to position Shimano SPD-SL road cleats
For Shimano’s established SPD-SL system, place the matching cleat against the compatible three-bolt shoe sole with its front pointing towards the toe. Fit the correct washers and three bolts and tighten them lightly enough to retain some positional movement. Check fore-aft location, side-to-side position and rotation before fully securing the cleat.
Shimano’s published installation guidance specifies final tightening of standard SPD-SL cleat bolts to 5–6Nm using a suitable 4mm hex bit and torque wrench. That figure belongs to the specified Shimano system, not every cleat brand on the market. Follow the manual supplied with your exact pedals and shoes if it gives a different instruction.
Fore-aft movement changes where the pedal axle sits relative to the foot. Lateral movement shifts the shoe inwards or outwards relative to the crank, while rotational adjustment affects the natural angle at which the foot rests when engaged. These dimensions are related but distinct. A shoe rubbing the crank may need lateral assessment, whereas a rider whose heel is forced into an unnatural angle needs rotational adjustment rather than simply moving the cleat forwards.
What changes with Shimano SPD-SLR cleats?
Shimano’s newer SPD-SLR road system uses an updated cleat and pedal interface. According to its technical installation guidance, the red, yellow and blue cleats are intended for compatible three-bolt shoes with elongated mounting holes. With those shoes, the sole’s holes provide fore-aft adjustment, while the cleat arrangement provides lateral movement.
For older road shoes with round rather than elongated mounting holes, Shimano offers a grey SPD-SLR cleat with additional adjustment built into the cleat. Check the exact compatibility information before ordering. Not every three-bolt cleat will offer the same positioning range or stack height.
Shimano specifies 5–6Nm for the SPD-SLR cleat mounting bolts as well, but the hardware and washer arrangements differ between versions. The newer interface does not mean that SPD-SL cleats will work on SPD-SLR pedals, or the other way round. That confusion is especially easy for riders who own more than one pair of road shoes.
How do you set two-bolt SPD cleats?
With Shimano SPD shoes, the cleat normally sits in a recessed channel in the outsole. Shimano advises starting with the ball of the foot above the cleat area, then centring the cleat laterally and adjusting its angle so the foot can settle naturally. Fit the correct backing plate and mounting hardware for the shoe and cleat model.
The appropriate fitting procedure can differ between shoes with exposed mounting plates, enclosed channels and varying tread depths. A thick tread can interfere with pedal engagement if the cleat or shoe is incompatible. Always test the actual shoe and pedal together, not merely the cleat on its own.
Two-bolt systems are popular for gravel, cyclocross and commuting because the cleat is recessed and usually easier to walk on. Their convenience does not eliminate the need for correct adjustment. Our SPD versus SPD-SL guide explains the riding and walking differences.

Does cleat float change the right position?
Float describes how much a clipped-in foot can rotate before it reaches the limits imposed by the cleat and pedal. It is not the same as cleat rotation, which sets the resting orientation of the foot. A generous float range may help a foot move naturally, but it will not automatically correct a cleat fitted at the wrong angle.
Road cleats often come in colours corresponding to their float characteristics. Shimano’s SPD-SL and SPD-SLR families use colour coding, but their parts and interfaces are different. Check the exact product rather than assuming a colour alone guarantees compatibility with a pedal.
A rider who feels the heel continually pushing against the end of the available float may need a position review. Do not assume the body needs to be trained to accept that forced angle. Persistent knee or foot discomfort deserves consideration of the complete bike fit, footwear and riding load.
Set rotational alignment without forcing your knees
Many people naturally walk with their feet pointing slightly inwards or outwards. Clipless pedals should not be used to impose an idealised perfectly straight foot position without accounting for how an individual moves. As a starting point, orient the cleat so that the foot can rest comfortably through the pedal stroke without constantly reaching the limits of float.
Test the position in a stationary, supported situation. Pedal gently, notice whether the knee tracks comfortably, and check clearance between heel, crank and chainstay. If the position feels restrictive, stop and make a small change. Avoid trying to diagnose complex pain patterns from a single online measurement.
If discomfort persists or you have a history of knee, hip or foot problems, seek appropriate clinical advice or a qualified bike-fit assessment. A cleat adjustment is not a guaranteed treatment for knee pain. Our road bike saddle-height guide covers another part of the overall position that may need checking.
How to fit and test the cleats safely
Before installation, inspect the cleats and shoes for wear, cracks and damaged mounting threads. Apply only the fastening and thread-treatment method specified by the manufacturer. Position the cleat using your measured starting point, then tighten the fasteners progressively to the correct torque.
Practice clipping in and twisting out of the pedal while the bicycle is securely supported, with no traffic or obstacles nearby. Check both shoes separately. A good setup lets you engage deliberately, release consistently and pedal without the shoe shifting on the cleat bolts.
Some pedals provide adjustable release tension. For a rider new to clipless systems, using the manufacturer’s permitted lighter setting may make practice easier. Check that tension adjustment is available on that exact model and do not confuse pedal release tension with cleat float.
Before riding, check all bolts have reached the specified torque and the cleat lies flat against the sole. A loose cleat can rotate unexpectedly, making disengagement difficult. This is particularly important after changing cleats, replacing shoes or transferring an old position to a new pair of soles.
When should you replace worn cleats?
Road cleats wear from walking and repeated engagement. Watch for substantial loss of material, cracks, insecure retention, unpredictable release or excess movement not attributable to the pedal mechanism. The manufacturer’s wear markings and replacement instructions take priority over a universal mileage target.
For two-bolt recessed cleats, check that the bolts and metal interface remain secure and that damaged shoe tread is not interfering with entry or release. On road cleats, inspect the contact points and any protective walking pads. If the system no longer engages or releases reliably, stop using it until the cause has been addressed.
There is value in marking a successful cleat position on the shoe sole before replacing worn parts, or recording its fore-aft and lateral setting. That gives you a repeatable starting point when you fit the next pair. The final check is always the same: the shoe must work securely with the matching pedal, release predictably and allow the foot to move naturally.

